Monday, May 17, 2010

Pole Beans, Sunlight, and More!

To my delight the sun came out today and STAYED!  Yay!  They predict at least three more days of sun before the possibility of more rain.  It was a bit windy today as well, which helped aid the drying process.  I am happy to report I will finally be able to get out and do some more work in the garden!

That being said, I am a little distraught over the current state of my leeks and cabbage babies.  They were supposed to be in the ground May 1st, but due to my out of town trip and the crazy weather, I have not had a chance to get them all in.  They are outside in their peat pots, but they don't look so good.  I am not sure if it is a lack of nutrients, or space, or what.  I did manage to get three cabbage baby plants in the ground out in the garden, but they look about the same as their peat pot brethren.  If anyone has any suggestions, let me know!

This brings us to the pole beans!  I was able to plant green beans on one of the icky weather days.  They have not come up yet, but I suspect they have been waiting for some sunlight.  We will see if they start coming up in the next few days, and if not, I will plant more.  I also planted some purple Alyssum flowers in the flower box behind our mailbox, and they have sprouted!  They did great last year, and it was nice to have some pretty flowers to view, especially if all we got in the mail was junk.  I put down some wildflower seed today in our backyard as well.  Will update you when that starts sprouting.

Next on my agenda is to get the watermelon, pumpkins, zucchini, and tomatoes in the ground.  All of them are in seedling form except the zucchini.  I may hold off on planting the tomatoes until they are a bit bigger, but the watermelon and pumpkins are itching to get their vines going.  Not surprisingly, they grow rather fast.  I have some updated photos, but I decided to share them as a link this time.  There were just a bit too many!  Feel free to check them out!

  ^---- Click Me For Pictures!

Wisconsin Weather

Dear Wisconsin Weather,

Oh how I wish you would make up your mind.  So far this month you have given us few warm sunny days, nights of frost and FREEZE advisories, extremely high winds, and more rain in a row then seems necessary.  This makes it very difficult to get anything significant done outside!  For when it wasn't raining, it was cloudy, keeping the ground wet and muddy.  And when it was clear out during the day, the temperatures dived to freezing or just above at night.  Not exactly something I want my seedlings to have to deal with.  And so I have been sitting here waiting; waiting for the ground to dry enough to plant in moist soil, not mud.  Waiting for it to be warm enough that I don't have to dress in winter clothes to keep from shivering when outside.  Waiting for the delayed April showers to end, so I can finally have some May flowers!

So if you could, Wisconsin Weather, please provide some sun and warmth.  It would be much appreciated!

Your Resident,
Sara

Wednesday, May 5, 2010

First Outdoor Sprouts!


I was extremely excited when I returned home from being out of town to see that the strawberry plants already have flowers (photo at left)!  I am hoping that there are enough pollinators out there right now to help turn the flowers into fruits.  I also checked on my other outdoor plantings and am happy to report they have come up as well!  Here are some photos of my first outdoor sprouts of the year.


My faithful row markers!  Heart shaped leaves of the radish plant.


Beets!  I will have to pull up one of the seedlings when they get a little taller.  You can also see the twine I used to help keep my rows straight.


I have never planted carrots before, so I am not sure what their first leaves look like.  I am assuming this is it.  We shall see!


Collection from the lettuce bin.  Includes Spinach, and three types of lettuce.  The lettuce basically looks the same at this point in time.

More plantings! Final Indoor

I am finally caught up with my indoor plantings.  All the seeds I plant from now on will be outdoor plantings!  Yesterday I planted (indoors) Mini Soloist Chinese Cabbage, two small types of pumpkin (Batwing and Sweet Sugar Pie), an 'ice-box' watermelon called Sugar Baby, and some Dill.  All of the above can be planted directly in the ground without starting them indoors, but I wanted to give them a head start.  The dill in particular has no "indoor" instructions, and the only reason I have started it indoors is so I can place the plants more accurately.

Last year I started everything, except the root plants, indoors.  That is fine, however some plants do not transplant well, and it is best to stick with the instructions of in-ground planting.  Because the planting season in Wisconsin is shorter than other locations, I like to start the watermelon and pumpkins, which need hot weather and soil to grow, indoors.  It ensures that you can actually harvest ripe watermelons and pumpkins before the fall frost!

Saturday, May 1, 2010

Seedling Photos

Due to an unexpected trip out of town, I am a little behind schedule with my indoor and outdoor plantings.  I don't arrive back home until late tomorrow evening, so things will continue to be on hold until Monday.  In the meantime I am posting some photos of my seedlings as they appeared on April 27th.  Enjoy!


Cabbage Babies


Habaneros growing their second set of leaves!


Leeks!  Getting ready to be put in the ground.


Tomatoes!


A hot pepper plant unfurling.


Gaillardia flowers


My plant habitats.  Short greenhouse and tall greenhouse.


Vents on the tall greenhouse to allow fresh air in and lessen the amount of humidity inside.

Monday, April 26, 2010

First Plantings!

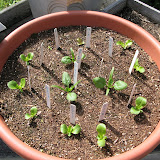
This is a bit of a delayed update, as I was unable to get this done on the day/days it took place.  On Wednesday and Thursday of last week, I finally got my first outdoor plantings in the ground.  The picture to the right shows my 'lettuce bin'.  I decided it would be better to plant the lettuce near the house so that it is easily accessible at meal time.  Planting it in a container also frees up more space in the garden, so that is a bonus too!  Since lettuce plants have short root systems, they work rather well in containers.  Even long root plants can be in containers, but they normally need a bit more space.  With lettuce and several types of herbs, you can really crowd them in a container, and they will still do great.

In the container I planted spinach, 'Baby Star' romaine, buttercrunch head lettuce, and a special mix of leaf lettuce from my local garden center.  I plan on planting some more spinach in a few weeks in the garden, and possibly some extra buttercrunch, so that we will have a steady supply.  It will be even fresher than the "fresh" lettuce in a bag you can buy at the grocery store!  And the best part is that you only need to pick as much as you'll be eating that night.  No rotting lettuce in the fridge!

 Next I planted a few things in the garden itself.  I wanted to try carrots this year, so I got some dead leaves and other organic material and mixed it in with the soil in the area where they would be planted.  I had originally planned on buying sand to mix in, but the ladies at my local garden store said that it was not necessary.  One of the two said they grow carrots every year, and that the carrots even grow in the clay!  She just suggested mixing in the organic material to keep the soil loose enough for the carrots to do their thing.  We will see how it turns out!

I planted one five foot row of carrots with the plan to plant more later on.  I also interspersed a few radishes to help mark the row, since they come up very quickly.  I used radishes with beets as well.  Once again I did not plant all the rows that I plan on using, but I did map the rows out so that the rows are straight and I don't accidentally overlap.  I planted beets last year, but they didn't turn out.  I am crossing my fingers that this year they will work.  The location they were in combined with the late planting and somewhat odd weather, probably lead to their demise.  So with an earlier planting time and new location, I am hoping they do better.

Last but not least, I put black plastic over the majority of the un-planted portions of my garden.  Most of the areas won't be used until I transplant my indoor seedlings, and in the case of the peppers plants, that won't be until June!  Putting the plastic down does a couple of things: 1. It reduces weed growth.  Anything that helps cut down on weeding is a plus.  (Especially a chemical free alternative!)  2. It helps warm the soil, and keep it warm.  Plants like warm soil, and watermelon REALLY likes the ground to be hot when it gets started.  The worms don't mind either.  And 3. You can plant without removing the plastic.  If you cut little holes that are just big enough for your transplant, you can leave the plastic there keeping the weeds away, and providing a 'clean' surface for your produce to grow on.  I had the plastic down for my watermelon vines last year, and it was great.  The watermelon grew right on the plastic, and required only light washing before it was ready to cut into.  It is important to pop some drainage holes in the plastic after it rains, so that the water still makes it into the soil.  The reason you wait for rain is to see where the water pools naturally.  If you would rather not wait, you can always water your plastic and do it that way.  Whatever is easiest!

More to come this week, including some photos of the seedlings.  The tomatoes are already an inch tall!

Tuesday, April 20, 2010

Tilling, Graphing, Over-thinking

Good news!  We got the garden tilled!  At left, you can see why tilling is important.  That is the "before" photo.  You can see the weeds that had already moved in and made themselves right at home.  But not to worry, more weeds will come to replace those that we destroyed.  The soil in the garden gets compacted over the winter as well, and needs to be loosened to allow seedlings to put down roots easily.
 To complete the task, we rented a mid-tine tiller.  Last year we got the GIANT rear-tine tiller, and Tom said it cut through the ground like butter.  Mid-tine tillers are able to cut sod, but are not powerful monsters like the rear-tines.  That meant Tom had to work extra hard to get the tiller to the correct depth.  Next year he votes for a rear-tine. Even though it is a bit over powered, it is super fast, and would dramatically cut down on the time spent tilling.  I am sure Tom's back would appreciate it too!


Here you can see the finished look of the tilled soil!  It looks 'fluffy' and ready to be planted.  You can also see a bit of my madness from the twine graph I made.  Last year I did some extreme estimating to decide how much space I had and where I could plant everything.  The main issue is that the garden plot is irregular making it extremely difficult to map out.  We rent the duplex we live in, so I had no choice on plot dimensions.  When we got here, there was a fenced in garden plot full of tall weeds.  We got rid of the weeds, tilled the garden with the mega tiller, and planted.  This year I wanted to map out my plantings a bit more, since I am planting more things and putting things in at different times.  I would hate to plant stuff, only to have to destroy it because I need the space for something else!

Behold my translated map!  Completely to scale!  The hand drawing makes it easier to see how oddly shaped the garden is.  You'll notice that I separated it into two sections.  They are actually connected, but for the purposes of my map, it was easier to separate them.  Part of the garden is not on the map.  That is the area where I already have strawberries from last year, and then a "compost" section where we store grass clippings for mulch.  It is not an official compost, since it is not covered and we do attend to it, but it does have decomposing plant life in it from last year.
Throughout my task of making a grid over the garden and then drawing my to-scale model (I made a rough draft too!), Tom was giving me the 'You know you are completely insane, right?' look.  I responded with a simple, 'Yeah, I know'  :-).  Obsessed and perfectionist are terms that would work as well, though I really just like having a structured plan and a visual to go with it.  I actually find mapping out my plantings as fun as the actual garden work!  And speaking of ACTUAL work, I had better go do some.  Will update with what I have planted asap!

Friday, April 16, 2010

Tomatoes!!!! (And More!)


For most people, April 15th is tax day.  For me, it was plant tomatoes day!  I received my  google calendar reminder that on April 15th, I was to plant tomatoes and Gaillardia flowers indoors.  And so I did.  

I have three varieties of tomato.  Big Boy, Red Tumbling Tom Tomatoes (a cherry size variety), and Mr. Stripey (an heirloom that is red with yellow 'stripes' throughout the flesh and skin.  Also sweeter than regular tomatoes).  Since I had WAY too many tomatoes last year, I have only planted two of each kind this year.  I had eight plants that survived in my garden last year, and only one of them was a Mr. Stripey.  This year there should be less cherry tomatoes, and since Mr. Stripey is not as prolific as the other two species, that should help reduce the over all harvest.  I am also working on being pro-active in preventing Late Blight, a fungus, from affecting my plants.  Last year the blight exploded across Southern Wisconsin (as well as several other states) threatening the commercial potato crop, and killing many a backyard gardener's tomato crop.  Unfortunately my local Agriculture/ Horticulture extension office has yet to say anything about Late Blight yet this spring, but it seems to be showing up rather consistently so they are bound to say something soon. 

I should probably mention that I did plant some extra tomato plants for my mom's garden as well, but those won't be in my backyard.  :-)  And speaking of my mom, I started some Arizona Sun Gaillardia plants for her today as well.  
Arizona Sun Gaillardia is a perennial with red blooms ringed in yellow (as seen in the photo at left).  This gives the blooms an orange-y appearance.  I have started them indoors, because doing so allows them to bloom their first year from seed without a cold period.  Otherwise you would only have a green plant with no flowers the first year.  I have also been a little confused by the terms 'annual' and 'perennial'.  I always want the ones you plant once and then enjoy for years to be "annual".  As in an annual event, but alas that is not the case.

And not to feel left out, I planted (indoors) a few perennials of my own as well: Origami Mix Aquilegia.  They have 3 inch blooms, and continue to bloom for 12 weeks!  They are supposed to attract butterflies and hummingbirds, so I will have to let you know if it works.  Picture below for reference.  


Adventures in Gardening: SURPRISE dilemma


I have been counting down the days until the garden will be rototilled for awhile now.  After being out of town last week, I have been extra busy moving stuff that is 'un-till-able' out of the garden.  On Tuesday I accidentally discovered some VERY un-till-able objects smack dab in the middle of my garden.  I was rather enthusiastically removing the hay I had piled up around the (as it turns out) NON-perenial  Basil and pulling out the twiggy stalks left behind.  

Upon removing a large chunk of hay I saw fur and then in rapid fashion baby rabbits jumping in all directions!  My jaw dropped.  Thought one was to just replace the hay, and leave.  Thought two involved a terrible image of what would happen if the bunnies were still there this weekend when the rototilling was to happen.  Which brought me to plan A:  Make a new nest outside of the garden.  It turns out that is what professionals suggest, since the mother rabbit will look for her babies and resume care if the nest is within 10 feet of the original location.  However, the babies did not want to stay in the new nest, so I went with plan B: Shoe box.  

I gathered them up along with the nest material, and put them in a large shoe box.  Since it was after hours for businesses, I contacted a woman near by who rehabilitates wildlife.  She suggested the humane society.  I ended up going with an emergency vet clinic that takes wildlife, after unsuccessfully trying to reach the 'wildlife' lady at the humane society.  All of this craziness just to find out that the bunnies were old enough to be on their own!  Oh well.  They are probably better off away from my garden and the neighbor's pitbull terrier.  I was rather shocked that they were old enough because they were so tiny!  So you can see what I mean, I have attached a few photos.  Photos of the bunnies, and then a photo of me holding a cat toy that is slightly bigger than the little babies.  I didn't want to freak them out anymore by handling them again, so that is why I used the toy.  And no, my cat's didn't get to play with the bunnies.  I am sure they would have loved it had I let them!  (Bad Kitties!)


Friday, April 2, 2010

Plenty of Peppers!

Today I spent an hour planting the rest of the peppers.  I only mention that it took an hour, because I was somewhat amazed it took that long.  Granted, I did have to employ a few extra steps, but sitting there doing the work must have made the time fly.  At any rate, I now have seven varieties of pepper, including the habaƱeros, planted.  The six I planted today include four varieties of hot pepper: Hungarian Wax (or Hot Yellow), Long Slim Cayenne, Early JalapeƱo, and Red Peter Peppers; and two varieties of sweet: Fat 'N' Sassy Red Bell Pepper, and Rainbow Bell Pepper Mix (includes seven different colored hybrid peppers).  


My extra steps today involved labeling each pot so that I know which plant is which.  Having grown peppers last year from a variety pack that held five types of peppers in one packet, I now know that not only are the seeds indistinguishable, but the plants look amazingly similar as well.  That leaves you waiting and wondering what the heck you planted until the fruits form, and then it is too late to plant more.  If you enjoy surprises, you can always get a variety pack or go without labels, but I sort of like to know what I have growing!  It just depends on whether or not you plan on using ALL the seeds in a pack or not.  Had I needed (or had room for) 50 hot pepper plants, I would have been able to plant all the seeds.  Then labels would not have mattered much.  But I have no idea what I would do with that many peppers, and most backyard gardeners don't.  So if you are thinking of a variety pack because you want at least one of everything in it, then you might be better off buying each individually.  I know it is saving me a lot of grief this year!